


DIY Air Cleaner to Reduce Wildfire Smoke Indoors Infographics
Learn the steps you can take to create a do-it-yourself (DIY) air cleaner in an emergency, if portable air cleaners are not available or affordable. Two designs are available a basic design and a beyond the basics design.
On this page:
Beyond the Basic Design
- Download the Beyond the Basics Design infographic (pdf) (1,751 KB).
- Text version of the Beyond the Basics Design infographic.
Available in these languages:
- Arabic- عربى
- Spanish-Español
- Haitian Creole-Kreyòl ayisyen
- Korean-한국어
- Russian-Pусский
- Simplified Chinese-中文: 简体版
- Traditional Chinese-中文: 繁體版
- Tagalog-Tagalog
- Vietnamese- Tiếng Việt
- French-Fançais
- Portugues-Português
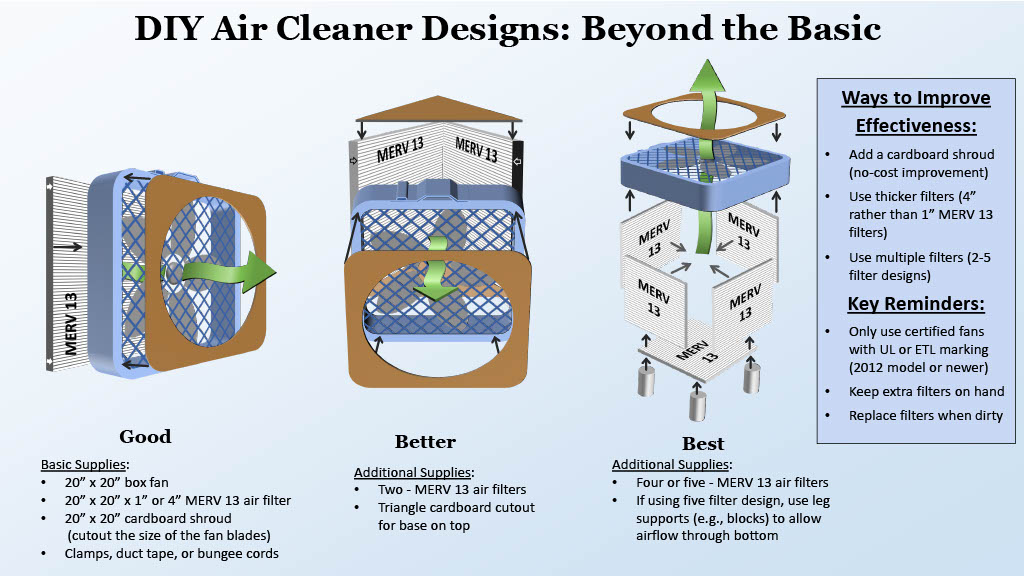
Text Version of the Beyond the Basic Design Infographic
DIY Air Cleaner to Reduce Wildfire Smoke Indoors: Beyond the Basic Design
Good
Basic Supplies:
- 20" x 20" x 1" or 4" air filter
- Suggested rating: MERV 13
- 20" x 20" box fan
- Only use certified fans with UL or ETL markings (2012 model or newer)
- 2p" x 20" cardboard shroud
- cutout the size of the fan blades
- clamps or Duct Tape or Bungee Cord
Better
Additional Supplies:
- Two - MERV 13 air filters
- Triangle cardboard cutout for base on top
Best
Additional Supplies:
- Four or five - MERV 13 air filters
- If using five filter design, use left supports (e.g., blocks) to allow airflow through bottom.
Ways to Improve Effectiveness:
- Add a cardboard shroud
- No cost improvement
- Use thicker filters
- 4" rather than 1" MERV 13 filters
- Use multiple filters
- 2-5 filter design
Key Reminders
- Only use certified fans with UL or FTL markings
- 2012 model or newer
- Keep extra filters on hand
- Replace filters when dirty
How to Make a DIY Air Cleaner Shroud Infographic
- Download the How to Make a DIY Air Cleaner Shroud Infographic (jpg)
- Text version of the How to Make a DIY Air Cleaner Shroud Infographic.
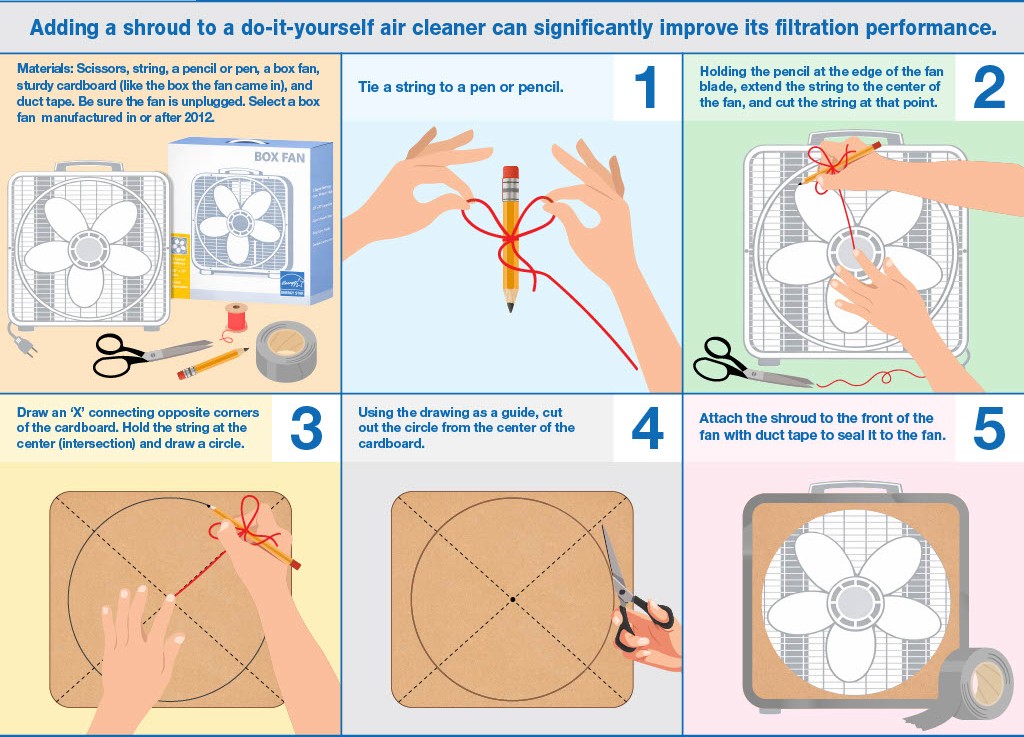
Text version of the How to Make a DIY Air Cleaner Shroud Infographic
How to Make a DIY Air Cleaner Shroud
Adding a shroud to a do-it-yourself air cleaner can significantly improve its filtration performance.
Materials: Scissors, string, a pencil or pen, a box fan, sturdy cardboard (like the box the fan came in), and duct tape. Be sure the fan is unplugged. Select a box fan manufactured in or after 2012.
- Tie a string to a pen or pencil.
- Holding the pencil at the edge of the fan blade, extend the string to the center of the fan, and cut the string at that point.
- Draw an ‘X’ connecting opposite corners of the cardboard. Hold the string at the center (intersection) and draw a circle.
- Using the drawing as a guide, cut out the circle from the center of the cardboard.
- Attach the shroud to the front of the fan with duct tape to seal it to the fan.